Monday 30 December 2013

Free for all: Vintage tray with Irit

Hello my dear crafty friends!
Irit is here again and this time with my  beloved printers tray.
I just can't stop to alter those frames and this is my Vintage love one.
 As you can see this Ranger crackled paint is just the bet one for the lovely vintage looked cover of Tando chipboards.


All other  inserts are just  a mix of so called " vintage trinkets" and I really love this look of the frame.
See you in a week with more Tando inspiration!

Sunday 29 December 2013

A Christmas Card

Good morning to you all, I'm back after having enjoyed the festive season in ArdĂȘche (a very beautiful area in France) during my Christmas holidays with my in-laws. Hope it's the same for you and that you have had a couple of days filled with merriment and love.. Well, what better way to finish the year now than sharing with you a Christmas Card? Maybe it can still inspire you if, like me, you're in very late for making all your Christmas and New Year festive cards!...


About the technical details, the central image is from Crafty Individuals (CI-211 'An Adorable Christmas Angel'). I stamped it using Jet Black Stazon on an ATC (Artist Trading Card) canvas and coloured it with my distress inks. I also used two different small snowflakes from the CI-282 ' Christmas Elements' set of stamps and some other French brands stamps in complement (for example the beautiful chevron-patterned Star at the upper right side) to do the background of my front card panel, before assembling and affixing all my embellishments onto it. I remember having heat embossed some of these stamps in gold and black... Also splattered Gesso (a bit diluted with water) on my background at the end to add interest, spreading like snow on the scene. LOVE the three mini brush stroke trees I also introduced at the bottom...  They were simply inked using a fab green colour so-called 'Cactus' (an Izink ink from Aladine that contains a lot of pigments), and I just sprinkled a bit of Glamour Dust Gold on top of them in addition.. Hope you like this card with this lovely angel as I plan to show you two other versions next week with other Tando goodies! You capop on over my blog for the full list of supplies if needed. 

I used:
Tando Mini's Brush Stroke Trees

Thank you for being here today.... Also, Happy New Year's Eve!!! Hugs, Coco xxx

Thursday 26 December 2013

Monday 23 December 2013

Free for all : Music in our hearts

 Just a simple card to say you all : You are my Best crafty friends and I am proud of it!

Lovely Tando Misic chipboard was added over this simple stamped card for this Free for all week

Sunday 22 December 2013

A couple of cards


I love the extra bit of detail that Tandos little chipboard pieces add to cards.  For my first card, I inked and then covered the tree in glossy accents and fine glitter to get a real sparkle.  This topped off the layers of stamping, washi tape, paper and lace.


I decided to go for a wintry scene for my second card and punched a moon, and then made a rolling landscape complete with a fe pine trees.  I added one of the beautiful reindeer from the grab bags, covering it in ink and glossy accents too.

Wishing you all a lovely Christmas.

Katherine

Friday 20 December 2013

Free For All: Reindeer cards and tag

Hi all! I have two cards and a tag today featuring the Triple Reindeer stencils. This set of reindeer is supplied as three separate elements including both a mask and a stencil, so it's really a great set that can be used in a whole host of ways! I played with two of my stencils here, using a foam pad and paints mainly.


On this first card, I put PA Fresco Finish Rose paint over my stencil and immediately poured a bit of Gold Glitter (like that you do not need extra glue), but only at some parts in order not to hide completely this unusual shade of colour chosen for my deer. Love this combo of turquoise and rose!... I also added a small dot of Liquid Pearls (Peacock) at the end for the eye.
For this card and the second one below, I played with lovely Crafty Individuals stamps combined to beautiful French clear stamps from Lorelai Design (the card above), and replaced the pink colour by a red one. I also heat embossed some of them in Gold.


And here's a very quick tag done with some leftovers using the same technique ! On this tag, I also used the mask Joined Snowflakes for the background.  


Love the accents of red paint stressed a bit more at some edges of my stencils using a small brush, giving depth and a subtle sheen to the two last reindeer... 

Here are the products I used:

Mask - Triple Reindeer  Mask - Joined Snowflakes

Hope you like these simple samples of how you can exploit such combined Tando mask/stencil on your winter creations! You can also hop over to my blog if you need the full list of supplies.

Thanks for stopping by, have a lovely weekend! Hugs Coco xx

Thursday 19 December 2013

Happy holidays card: Free for all week

Hello my dear crafty friends and welcome to this FREE FOR ALL week! 
This is a very simple card made with Tando most gorgeous chipboad  piece and as you can see the oval part is covered with stamped sentiment.

So Merry Christmas to  all my friends around the globe!


Wednesday 18 December 2013

the Lets Sparkle

challenge is still live over on our challenge blog - pop on over and see who's turn it is today to share their piece and you've still got time to join us......see you there.

Tuesday 17 December 2013

Matching Card and Tag

You know when you have an idea for something and it seems simple enough until you start it? Well this is one of those. I've used 2 of the ~{Set of 5 Snowflake Stencils}~ and inked through them then cut them out. That was far more fiddly than I'd anticipated!!


I'm glad I persevered though as I'm pleased with the finished things. I've used some wide, wired, glittery ribbon, pinched in on the card and a couple of glittery buttons.

It's finished off with a stamp I found that I forgot I had. Sometimes the rubbish memory gives you pleasant surprises!!

Keep heading back here every day to see more of the team's creations.

Kaz xxx

Monday 16 December 2013

House Shaped Advent Calendar with Dana


Hi Tando fans! Dana here today sharing my House Shaped Advent Calendar. I had a blast putting this project together. My daughters are having so much fun counting down the days until Christmas, especially when every drawer contains a special treat!


I started by covering the house with some cozy patterned papers. I used the Joined Snowflake Mask to add some textured stars to the snowy scene on the sides of the house.


I smoothed molding paste over just the centers of the snowflakes on the mask, which was the perfect design for the sky. I added Mini Snowflakes that I colored with acrylic paint and glitter glue.


To aid with opening, I attached small wooden plugs to the center of each drawer.


I wanted to embellish the roof with realistic looking "shingles" so I used a die to cut patterned paper to cover the roof. I added some "snow" to the top of my roof and covered it with a layer of glitter glue to give it the fantastic sparkle of fresh fallen snow.


Thanks for stopping by today!

Saturday 14 December 2013

Celebrate Winter with a fancy banner

Hello my dear crafty friends! Irit is here again and today I will show you my fancy Snow banner. This is totally Tando project, made with Tando banners, Tando word SNOW, Tando  mini and regular  Snowflakes and ... OK, some other goodies too, but it shouts " TANDO".

Now some single shots of each and every banner piece.


This is my way to celebrate winter in the country with no snow at all. So I make my paper snowflakes and feel the winter season I love so much.


Friday 13 December 2013

Party Invite!!

I've made an invitation to a New Year Party for my project this week.


I started off with a card blank and did a Pan Pastel strip down it, then used Pan Pastel through the~{Clock Mask}~. I love the way this gives a shaded look straight off without using a second colour. The trick is to get a good bit on the sponge. I gave it a good spraying with a mega cheap hairspray - cheap seems to work better than posh ones!

I then took two of the stars from the ~{Mini Stars}~ and painted them with acrylic paints, inked the edges, smudged white pencil on the middles and doodled on them. I stamped the words in place.

I gave two balloons from the ~{Mini Balloons}~ the same treatment.

Two arrows from the ~{Mini Arrows}~ were painted and then everything was stuck in place. I finished off with some doodling and rub on letters.

Kaz xxx

Thursday 12 December 2013

Party Time - Christmas Reindeer RSVP Card


Hi Tando fans! Dana here today sharing a Christmas card for the Party Time theme this week. I created this card with the gorgeous Running Reindeer


I used mist, crackle paint and Kosher salt to create the finish on this reindeer. This tutorial by Tracey Sabella was my inspiration.


Thanks for stopping by today!

Wednesday 11 December 2013

CHALLENGE DAY...

there is a new post up on the challenge blog - pop on over and join us and you could win yourself an extra Christmas Present... see you there....

Tuesday 10 December 2013

Birthday Party !!!

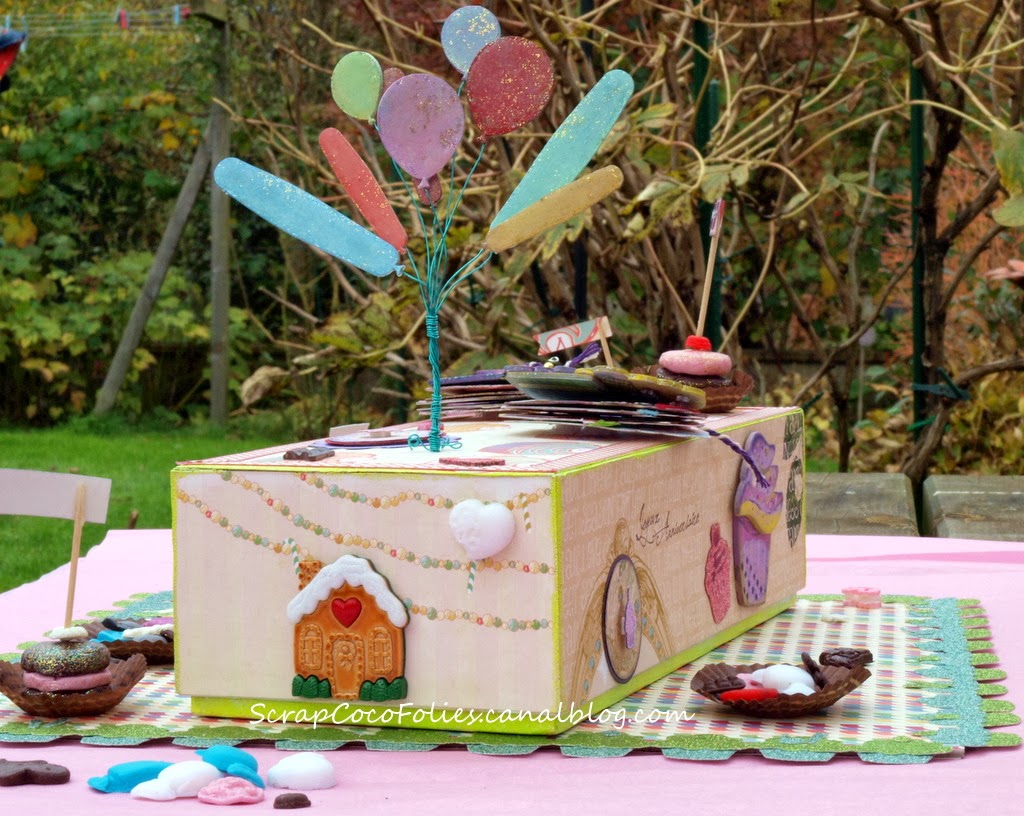
Hellooo, Coco here with a big party project, and a lot of decorations!!! I made this to celebrate the 6 years of my twins with her mates... As you will see, it includes the two mini Cupcakes albums I showed you a couple of weeks ago, for the Celebrate week!


Do you want to know the start of my creative process?... Yes??... Well, an old box with cards to learn to read belonging to my children!


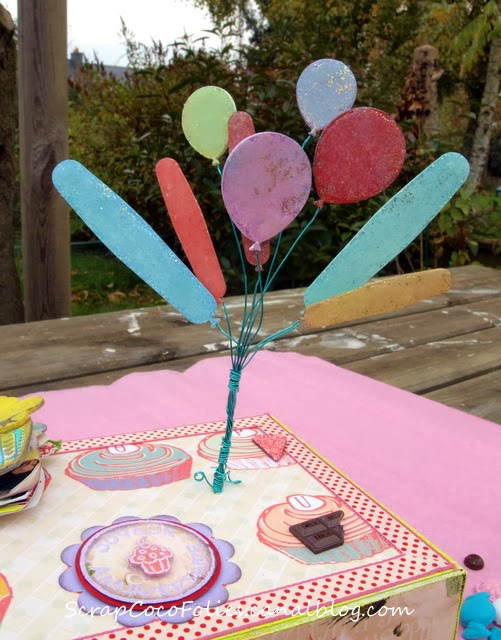
I kept the cards inside for another usage maybe later, and gessoed the box on the edges only as I wanted to cover it with papers. I also put a light coat of Gesso on my balloons which are from the small grab bag of balloons. Next I coloured them with several trio Brilliance inks... also added glitter!... :-) I used a mix of gold and silver glitter dusts. I don't remember if I applied them before the ink was dry, or if I used my glue pad to better fix them! You will have to experience that by yourself if you do the same! 


Don't hesitate to pop on over to my blog here to know how I created my beautiful bunch of balloons in the air. I have prepared step by step instructions if you wish to do again something like that for your kids or grandchildren one day. I don't put them here because of the number of photos that come with them!!


I heat embossed with Frantage aged rose embossing enamel two mini hearts and my small banner, also by Tando. I glued on each flag a tiny reproduction of an extra-large banner of flags also created for the occasion... you can also see it on my blog. That was a perfect combination as I had exactly 7 scalloped flags in both banners! :) 
By the way.... Did you notice on the top the two Cupcake albums I showed you a couple of weeks ago?... I put on their back and on the lid of the box a few bits of velcro. Thanks to that I can easily withdraw or affix them as desired! 


I used the remaining Tando's Cupcakes from the grab bag to decorate the sides of the box, combined to a few stamped images. I used different colours of paints to embellish them.


My box is lying on a tray done from a board square of dimensions 30.5x30.5 cm (12-inch). I cut it in thick greyboard, and glued on each of the two sides a scrap paper from an old festive collection by Webster's Page. The tip of gluing on the reverse side another sheet of paper allows to absorb the distortions of cardboard under the effect of glue! I also edged the tray with four strips of cupcakes cut out from glittered papers using a Sizzix strip die and assembled.

Here is a top-view of my final project with all the elements... I also created small gourmet mini cakes and sweets in Polymer (Wepam & Fimo) to fulfill the tray.


At the end..... all can be stored in the box haha! :-)  Even the balloons can be withdraw if needed.


I really hope you like this funny project, even if is not a Christmas one... But I think it can easily be adapted to do a beautiful Christmas table, don't you think so?...  

Supplies from Tando Creative:  

Cupcake Set Small

Tando Mini's - Balloons

Tando Mini's - Hearts

 Bunting Small Scalloped

Thanks for stopping by and have a great day! Hugs Coco xx

Sunday 8 December 2013

Icy Winter Card with Dana


Hi Tando fans! Dana here today wrapping up the Icy Winter theme from this week with a snowy card. I misted over the Joined Snowflake Mask with blue mist to create a snowy background for my card base.


I colored three Mini Snowflakes with acrylic paint and Glimmer Glam. I ran the edges of my card through the same acrylic paint and Glimmer Glam for a frosty feel and then finished my card with a sticker sentiment and a ribbon bow.


Thanks so much for stopping by today!